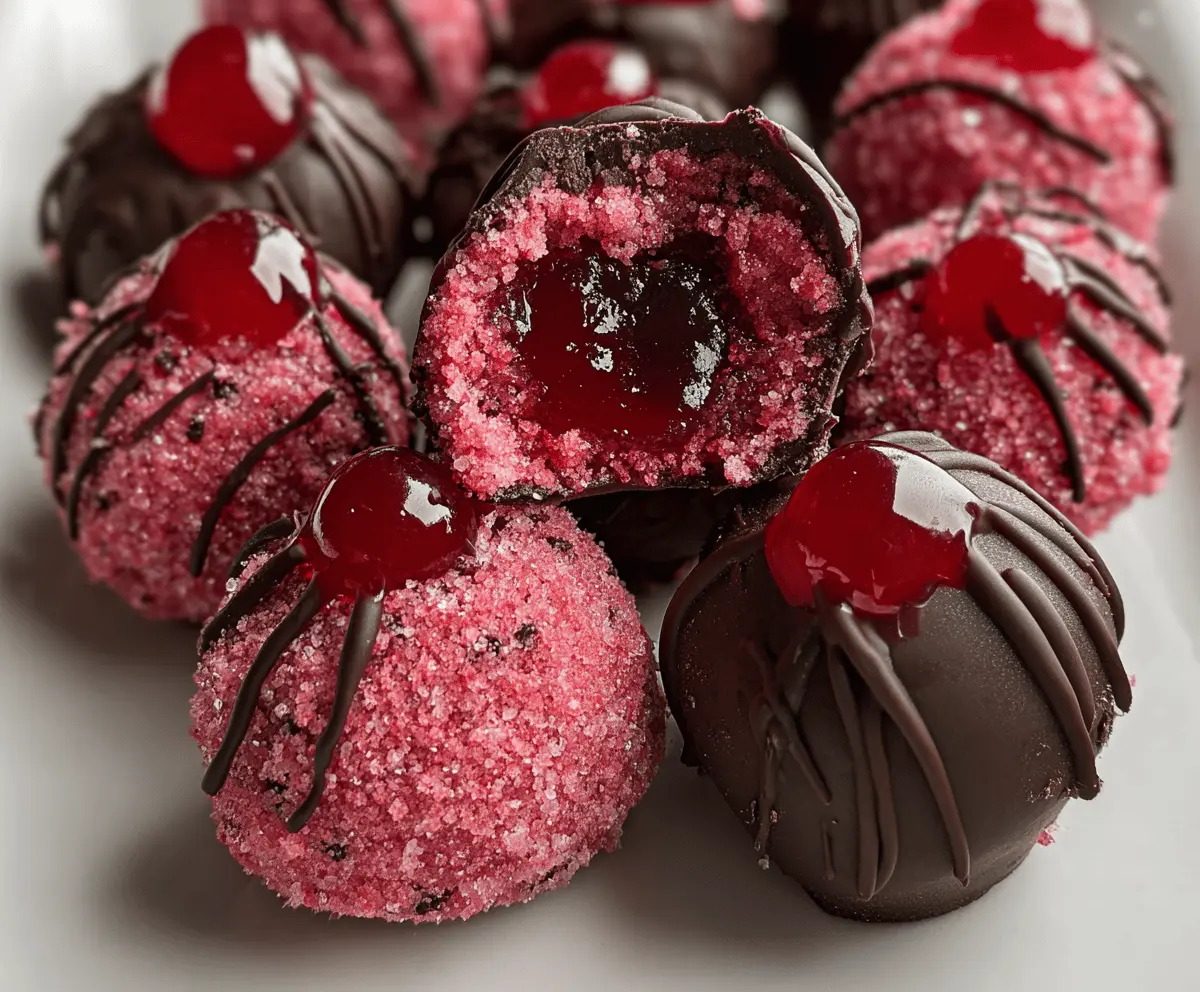
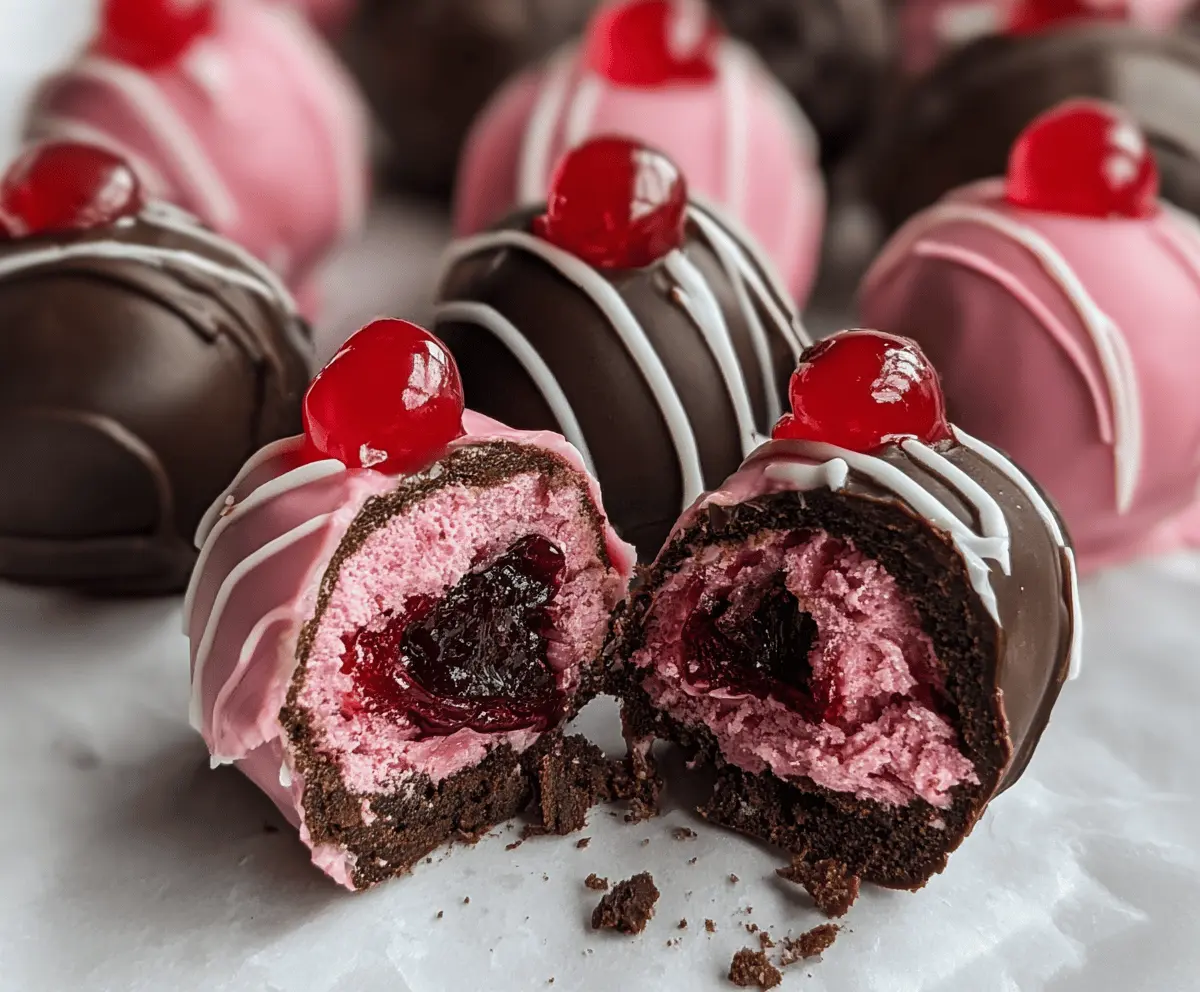
This easy homemade cherry mash candy is a sweet treat that combines cherries, chocolate, and a creamy filling. Perfect for satisfying your sweet tooth without much fuss!
Making this candy is always a fun little adventure in my kitchen! I love how the bright cherry flavor shines through, and let’s be real, chocolate makes everything better! 🍫
What I appreciate most is how quick it is to whip up. Just mix, mold, and enjoy! It’s a great way to impress friends or to enjoy a nice snack all for yourself.
Key Ingredients & Substitutions
Chocolate Chips: Semi-sweet chocolate chips are perfect for this recipe, offering a great balance of sweetness. If you’re looking for a healthier option, dark chocolate can be a great substitute. It adds a rich flavor that pairs nicely with the sweetness of the cherry filling.
Nuts: Pecans and walnuts work beautifully in this candy. If you have nut allergies or want to keep it nut-free, you can omit the nuts or use seeds like sunflower seeds for a crunch. They add texture without the risk of allergens.
Maraschino Cherries: These cherries give that iconic cherry flavor. If you’d like a fresher option, you can use fresh cherries. Just make sure to pit and chop them well, as they might add more moisture to the filling.
Butter: Softened butter gives the filling a creamy texture. You can substitute with room temperature coconut oil for a dairy-free version, though this will change the flavor slightly.
How Do I Make Sure My Chocolate Coating Is Perfect?
Coating candy might seem tricky, but it’s all about technique! Here’s how to do it right:
- Melt the chocolate carefully: Use a microwave in 30-second intervals, stirring in between. This prevents the chocolate from burning.
- Use a fork or dipping tool: This helps you coat each piece evenly. Just dip and shake off the excess chocolate for a smoother finish.
- Cool before dipping: Ensure the cherry filling is really chilled. This helps the chocolate get a good grip on the filling and avoids melting.
- Let it set: After coating, refrigerate the pieces until the chocolate is firm. This makes for a great bite.
With these tips, you’ll have perfectly coated cherry mash candies that are sure to impress!
Easy Homemade Cherry Mash Candy
Ingredients You’ll Need:
- 1 cup semi-sweet chocolate chips
- 1/2 cup chopped nuts (pecans or walnuts work well)
- 1 cup powdered sugar
- 3/4 cup prepared maraschino cherries, drained and chopped
- 1/4 cup butter, softened
- 1 tsp vanilla extract
- 2 tbsp corn syrup
- 1 cup crushed graham crackers
- 1/4 cup milk
How Much Time Will You Need?
This delicious recipe will take about 20 minutes to prep and an additional 1 hour to chill in the refrigerator. All in all, you’ll be able to enjoy your homemade cherry mash candy in about 1 hour and 20 minutes!
Step-by-Step Instructions:
1. Prepare the Cherry Filling:
In a mixing bowl, combine the chopped maraschino cherries, powdered sugar, crushed graham crackers, softened butter, vanilla extract, corn syrup, and milk. Stir everything together until the mixture is smooth and well-blended. This delicious mixture is your cherry mash filling!
2. Shape the Filling:
Once your filling is ready, use your hands to shape it into small oval or round mounds, about the size of a marble. Place each piece on a tray lined with parchment paper. Pop the tray into the refrigerator for about 30 minutes to help the filling firm up.
3. Melt the Chocolate:
While the cherry filling is firming up, it’s time to melt your chocolate. In a microwave-safe bowl, melt the semi-sweet chocolate chips in 30-second intervals, stirring well after each time until the chocolate is fully melted and smooth. Be careful not to burn the chocolate!
4. Add the Nuts:
Once your chocolate is melted, stir in the chopped nuts until they are well mixed. This will add a nice crunchy texture to your candy!
5. Coat the Cherry Mash:
Remove the chilled cherry mash pieces from the refrigerator. Use a fork or a dipping tool to dip each piece into the chocolate and nut mixture, making sure they are fully coated. Let the excess chocolate drip off before placing them back onto the parchment-lined tray.
6. Set the Candy:
After all the cherry mash pieces are coated, return them to the fridge and allow them to chill until the chocolate shell hardens, which will take about 30-45 minutes.
7. Enjoy!
Once your cherry mash candy is set, serve them chilled or at room temperature. These treats are perfect for sharing or savoring all by yourself! Enjoy your homemade cherry mash candy!
This homemade version of cherry mash candy replicates the creamy, cherry-filled center surrounded by a crunchy chocolate and nut shell, just like the classic treat!
FAQ for Easy Homemade Cherry Mash Candy
Can I Substitute Fresh Cherries for Maraschino Cherries?
Absolutely! Fresh cherries can be used, but make sure to pit and finely chop them. Keep in mind that fresh cherries have more moisture, so you might need to add a tad more powdered sugar or crushed graham crackers to maintain the right consistency.
What Can I Use Instead of Butter?
If you prefer a dairy-free option, you can use room temperature coconut oil as a substitute for butter. This will add a slight coconut flavor, so keep that in mind if you want to maintain a classic taste!
How Should I Store Leftover Cherry Mash Candy?
Store any leftover candies in an airtight container in the refrigerator for up to a week. They can also be kept in the freezer for up to 2 months! Just make sure to separate layers with parchment paper to prevent sticking.
Can I Make This Recipe Ahead of Time?
Yes, you can! Feel free to make the cherry filling and shape them into mounds a day in advance. Just coat them in chocolate the next day before you plan to serve, so they’re fresh and delicious!